Secure Connection between AWS VPC and a Raspberry Pi
(Photo by Alina Grubnyak on Unsplash) In a recent discussion with a colleague (in fact few months back, I have been slow on this one), they asked if I had a simple procedure to connect a Raspberry Pi running at home to a VPC on AWS.


(Photo by Alina Grubnyak on Unsplash)
In a recent discussion with a colleague (in fact few months back, I have been slow on this one), they asked if I had a simple procedure to connect a Raspberry Pi running at home to a VPC on AWS. By default, instances that you launch into an Amazon VPC can’t communicate with your home network. In this case, they wanted to have on-prem workloads interacting with workloads in the cloud. I had no simple procedure to share and there are many solutions to address that problem. Here is a non-exhaustive list:
- SD-WAN: There are several vendors that can address that use case easily. You probably don’t want to buy a physical appliance so a virtual form factor would be the way to go. However running a SD-WAN VM on a Raspberry Pi might be challenging as they are usually designed to run on x86. Of course, if you have another server at home (ESX, KVM…), this would be feasible but probably a bit messy (you will have to play with routing). Look at Riverbed SteelConnect on the AWS marketplace and this video.
- Site-to-Site VPN with a home router: Not all home routers will allow you to create VPN tunnels and very few have routing capabilities that will allow certain traffic to take the tunnel while the rest of your home network will directly breakout to the Internet. If you have a networking gear a bit more advanced like a Ubiquiti Security Gateway or Dream Machine (Pro even better, that’s what I have), then you can leverage this infrastructure to connect your Pi to AWS.
- Site-to-Site VPN from the Raspberry Pi: This sounds like the most straightforward solution. You probably don’t need your full home network to connect to AWS, install a VPN client on the Pi and get it connected to your VPC.
- Alternate solutions like ZeroTier and Wiregard: There are cool alternatives to traditional VPN solutions that you may want to explore.
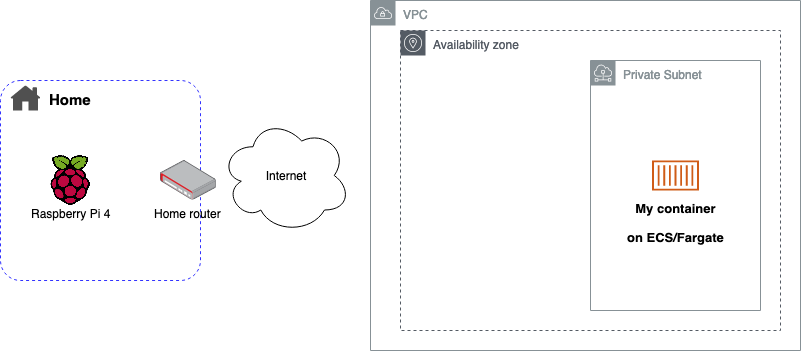
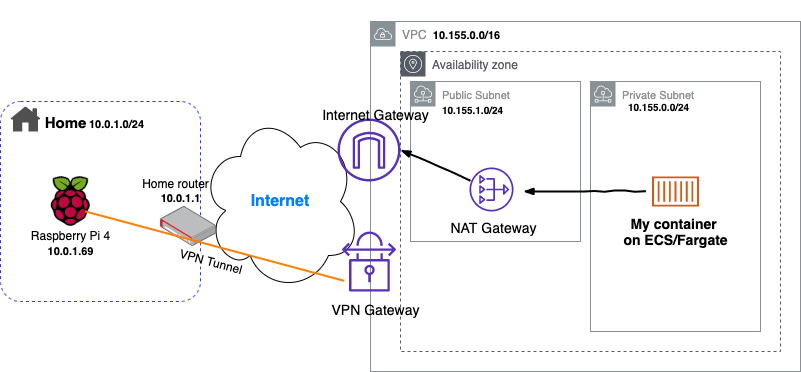
For this exercise, I am going to run a simple container on Amazon ECS/Fargate and will call the API it presents from the Raspberry Pi. The container will be deployed in a private subnet in one of my AWS VPCs. It could be anything else like a EC2 instance for example.
I set a static IP address on the Pi so it is easier to manage.
sudo nano /etc/dhcpcd.conf
Building the AWS infrastructure
In the following, I’ll assume you have no VPC already built and we will do it together. As always, there are multiple options to build our infrastructure on AWS: using the console, the AWS CLI, CloudFormation, Terraform… We are going to use the AWS Cloud Development Kit (CDK) to build the various topologies.
Prerequisites:
You need an AWS account with a IAM User or IAM Role with an AdministratorAccess or AmazonVPCFullAccess
The AWS CLI allows you to interact with AWS services from a terminal session. Make sure you have the latest version of the AWS CLI installed on your system. (Download here for Mac, for Windows or for Linux)
We will use node.js in this example. You could use Python, Java or Typescript. It will be easier to follow along with node.js so I recommend you install it from nodejs.org.
A text editor or IDE of your choice. I’ll be using VSCode.
Install the AWS CDK toolkit from a terminal session
npm install -g aws-cdkInstall also the EC2 library that will use
npm install @aws-cdk/aws-ec2
Initialize the project:
The first step will be to create a folder then initiate cdk and create the project structure:
mkdir cdk-aws-vpc-s2s-vpn && cd cdk-aws-vpc-s2s-vpn
cdk init --language typescript
The tool has generated several folders and file. Now we are going to bootstrap cdk and deploy a first time. Since we have not written any code yet, it will just create a CloudFormation bucket which will be used to store all the CloudFormation templates that CDK generates for you.
So now we are ready! I’ll skip the SD-WAN solution for now (maybe for a future post), we will start by using our home router.
Remark: I will not cover IPv6 in this article. It could be the topic of another one. Let me know if you are interested.
Site-to-Site VPN with Ubiquiti Dream Machine Pro (UDMP)
Although it is possible to deploy a VPN concentrator or a VPN capable router as a EC2 instance in a VPC, we are going to leverage the AWS Site-to-Site VPN service.
Building the AWS infrastructure
The follow diagram depicts the infrastructure we are going to build.
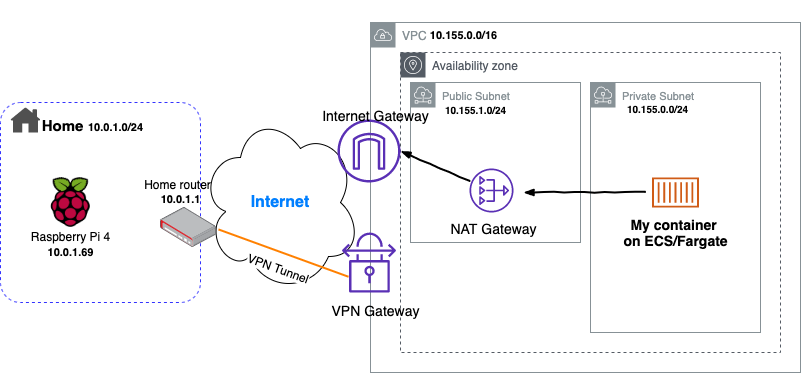
Now edit the file lib/cdk-aws-vpc-s2s-vpn-stack.ts that was generated previously, and replace its content with the following then save.
Let’s deploy with cdk deploy! it will take few minutes to create the VPC, the public and private subnets as well as the Internet Gateway, NAT Gateway and all the VPN configuration.
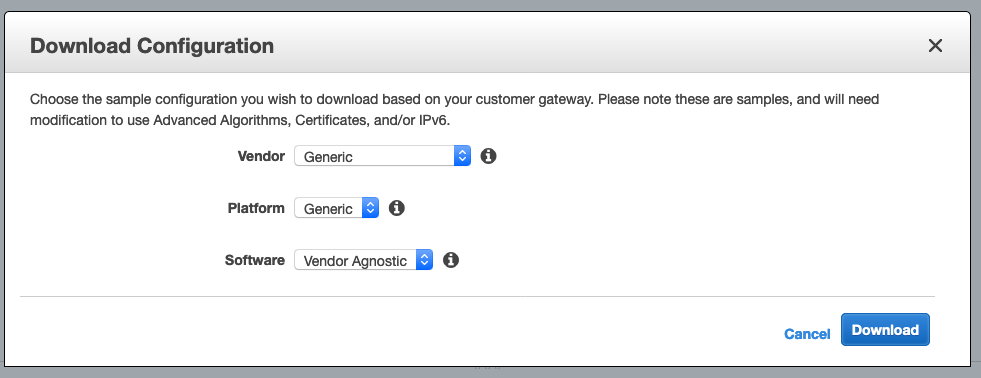
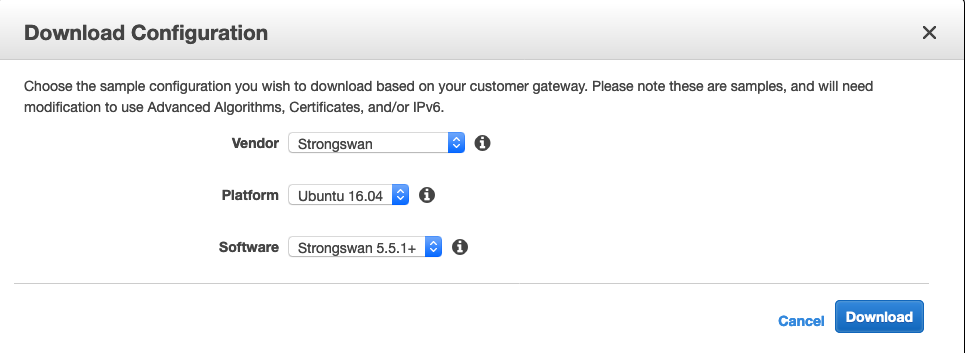
Once the stack is created, go to your AWS console > VPC > Virtual Private Network (VPN) > Site-to-Site VPN Connections. Select the connection that has been created (it should be named with the name of your stack) and download the configuation. Depending on your router, you may found your vendor and platform. In the case of the UDMP, we will generate a generic configuration file.
Your browser will download a text file with all the information we will need to configure our UDMP. So now, go to your Unifi portal, select your UDMP then Settings > Networks > Add New Network and fill the form based on the config file.

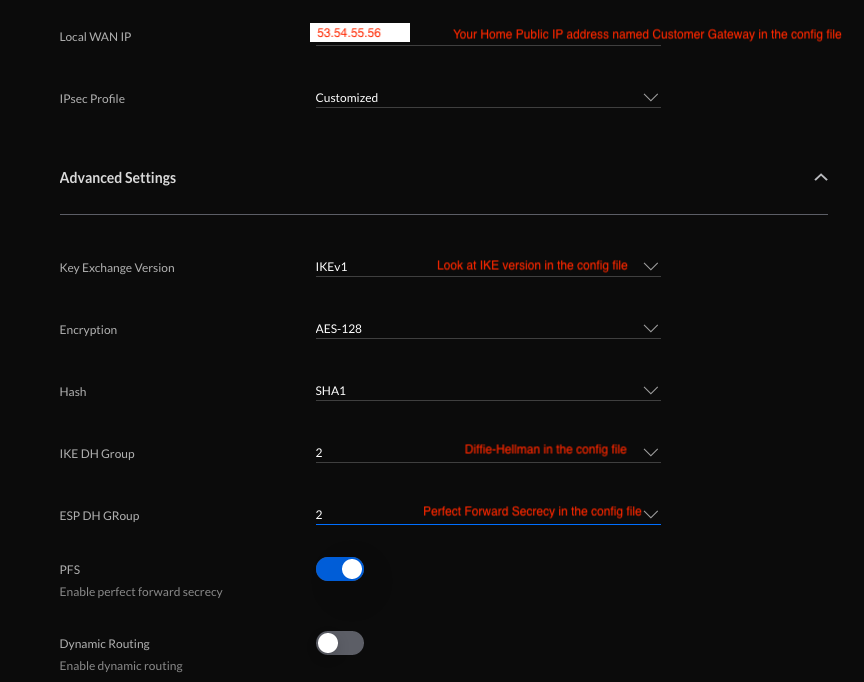
In our case, we are not using Dynamic routing. Should you have a bigger and more complex network, this would be the way to go. Add the network and now your tunnel should be built once the UDMP sees traffic. You can ping your EC2 instance and check that everything works as planned. It will take few seconds for the connection to establish so be patient. You can also check the AWS console VPC > Virtual Private Network (VPN) > Site-to-Site VPN Connections and select your connection then go on the Tunnel Details tab. You will see one tunnel being up. Indeed, we have not configured a second tunnel which would be a good idea for a product environment for redundancy. Simply create a second network of type “site-to-site” with the other endpoint IP address documented in the config file and change the route distance to 40.
My task on ECS/Fargate has the IP address 10.155.0.186 and I can send a request from the Raspberry Pi to this container. Mission accomplished!

So now, let’s try to make it the VPN connection from the Raspberry Pi itself. I removed the VPN config from the UDMP.
Site-to-Site VPN with Raspberry Pi and strongSwan
In this section, we will exactly the same infrastructure on AWS, the main difference will be that the tunnels will be formed from the Raspberry Pi. For that, we are going to install a VPN client called strongSwan.
I am going to reuse the previous setup on AWS and this time, I am going to download from the AWS console in VPC > Virtual Private Network (VPN) > Site-to-Site VPN Connections the configuration file customized for strongSwan.
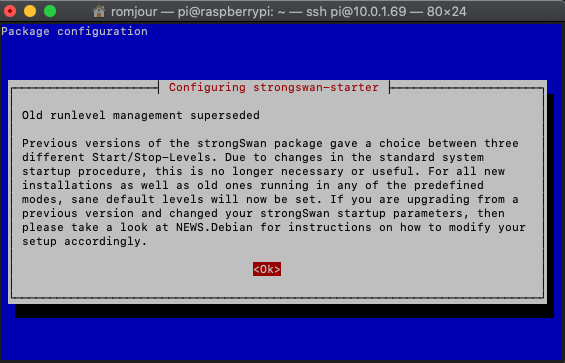
We need now to configure our Pi and install strongSwan. sudo apt-get install strongswan
Acknowledge the message that will be displayed and the installation will complete.
Then, just follow all the intructions from the configuration file. There is a long list of instructions but they are customized to your setup so don’t be afraid, you are in good hands. I configured routing manually following steps 2# to #5. For some reasons, the script would not kick off automatically and I wanted to keep control on things anyway (you will see why towards the end…).
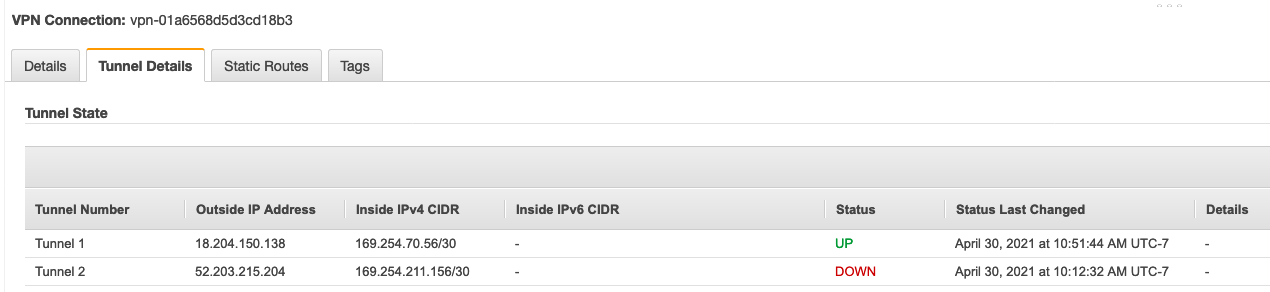
At the end of the process, you should see that both tunnels are up.

Let’s double check on the AWS console:

Let’s try now to ping our ECS task from the Pi

What? What’s wrong? Tunnels are up and we know that the configuration on the AWS side worked previously. So we should expect it to work. As we know, packets never lie so let’s take a capture while the same ping runs in the background.
 There are two things of interest. We can see traffic going in both directions and it seems that NAT Traversal (ipsec-nat-t) is enabled. So the tunnels seem fine.
Let’s now look into the tunnels to understand what’s going on. The ping still runs in the background.
 We see that traffic goes in one direction only. But the source IP address is not what we would expect. It is the Tunnel1 interface’s IP and in fact, it does make sense. The system uses the interface Tunnel1 to communicate with the VPC. However, the VPC network has no route to 169.254.70.58 and this is not routable.
Since, we enabled routing during the configuration with net.ipv4.ip_forward = 1 in /etc/sysctl.conf (documented in the configuration file), let’s test from another computer in our home LAN. This will confirm that our Pi is well connected via VPN to our VPC. I added a static route on my Mac to point towards the Pi for traffic destined to my AWS VPC: sudo route -n add -net 10.155.0.0/24 10.0.1.69.

The ping shows that the end-to-end connectivity is working and the traceroute confirms traffic is routed via the Pi. So we have to deal with the internal routing of the Pi to fix our problem now. We are going to leverage iptables to force the traffic destined to our AWS VPC to use the Raspberry Pi’s LAN IP address (10.0.1.69), when originating from the Pi itself. Indeed, I don’t want that all my LAN devices are seen with the Raspberry Pi’s IP address so I can keep control in my VPC. In the configuration file, in the section #2 Tunnel Configuration, I was given an IP range for each tunnel: 169.254.211.158/30 and 169.254.70.58/30. I am going to use those range in my iptables rules to change the behavior.
sudo iptables -t nat -A POSTROUTING --destination 10.155.0.0/24 --source 169.254.70.58/30 -j SNAT --to-source 10.0.1.69
sudo iptables -t nat -A POSTROUTING --destination 10.155.0.0/24 --source 169.254.211.158/30 -j SNAT --to-source 10.0.1.69
Now I can reach to my ECS task on AWS from the Pi:

We have now a fully functional VPN fron the Raspberry Pi that can be our local GW to the Cloud.
Conclusion & clean-up
In this article, we have explored different ways to connect your home network (and more specifically a Raspberry Pi) to AWS. I will write another post about the use of ZeroTier and Wireguard.
Don’t forget to tear down your AWS environment. Since we used cdk to build the infrastructure, we can just use cdk destroy to rollback all the changes.